What you need to know about Microsoft Teams Shifts
Shifts is a fairly new feature within Microsoft Teams; although it must feel very familiar to those who have previously used Microsoft StaffHub which is retiring this October. Shifts replaces StaffHub, and just like its predecessor, Shifts is targeted for first-line workers and their managers. In practice, Shifts can be used by, for example, hospital staff, factory workers, truck drivers, IT support or any kind of customer service personnel; basically whenever scheduling work shifts is required:
- There are long opening hours → several shifts per day are required, or
- The employees have a flexible work description → not every day consists of the same tasks.
Even though the feature has been a part of Teams for a while now, not that many have actually used it or know much about it. And that is exactly why I decided to write this blog post! Hopefully you’ll learn a lot, and do leave a comment if any questions arise which currently don’t get answered.
Get your Shifts together!
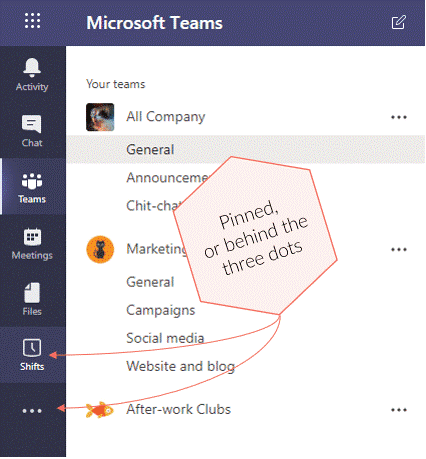
First things first: How do we get to Shifts? First-line workers will see Shifts immediately in Teams among the pinned apps on the left-hand side. Others will find it under the three dots by default.
To make Shifts visible to users immediately, a Teams admin can add them to the FirstLineWorker app policy either via PowerShell or by going to the Microsoft Teams admin center, expanding Teams apps, selecting Setup policies, and adding members to the app policy. Alternatively, the admin can pin the Shifts app for other types of employees as well by adding Shifts to the Global (Org-wide default) app setup policy.
Shifts is also available through the Teams mobile app. There you can find it under More apps. The GUI is simple to use by the workers, which is great. Managers, however, require the desktop view when planning future schedules.
Only one schedule per team
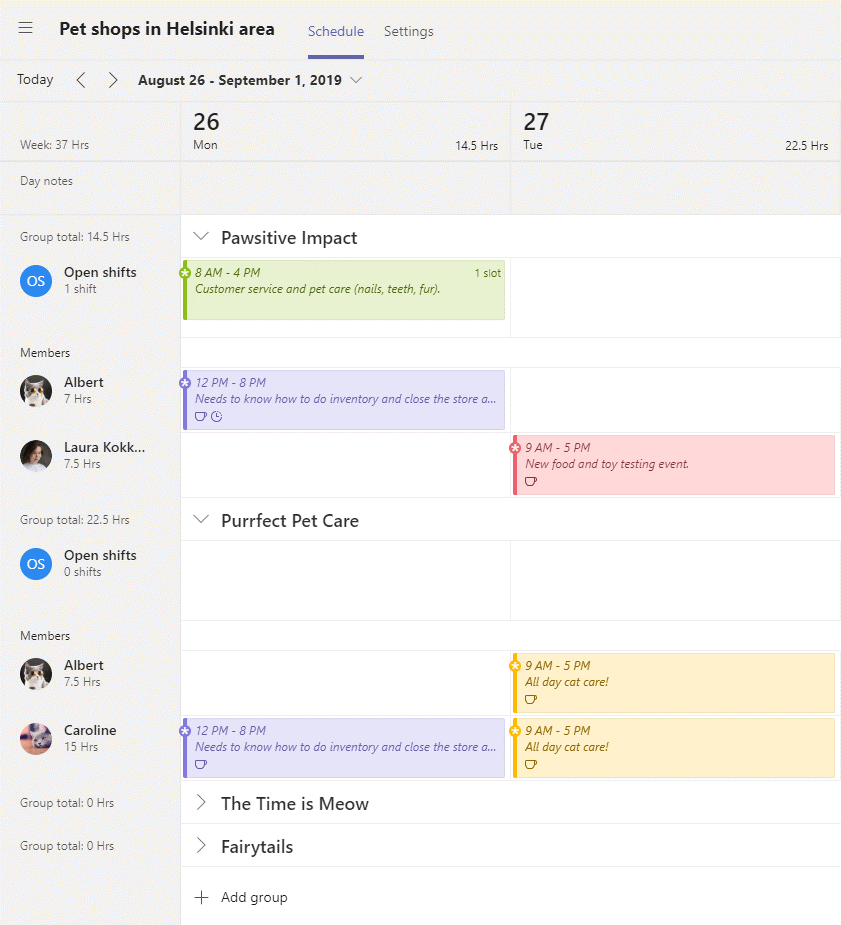
The Shifts feature is always tied to a team in Teams. Every team in Teams can have one schedule in Shifts. The team owners are the managers in Shifts, and they can create schedules to be shared with the members of the team. Note that guests can’t use Shifts at least for the time being.
When you click on the Shifts icon, three things can happen:
- If you are an owner of at least one team, but none of those yet have a Shifts schedule, you are presented with an option to create a schedule for one of the teams you own.
- If you are not an owner in any team, and none of the teams you are a member of have a Shifts schedule yet, you’ll see a message “It looks like there aren’t any team schedules for you yet”.
- If there exists a Shifts schedule for at least one of the teams you are an owner or a member of, you’ll get directed to that schedule. If there are multiple schedules available, the most recent one you viewed is displayed. If you’ve never been to Shifts before, you’ll see a list where you can choose which team schedule you want to view as your very first Shifts schedule ever.
When you have access to at least one schedule, you can open a list of all of your schedules and switch between them via the “hamburger” menu in the top left corner of Shifts. In the same view, you can also find the New schedule link for adding Shifts schedules for your other teams. Now you’ll hopefully find your way around.
There is currently no way to delete a schedule once it has been created, so your decision will be final for the time being. According to UserVoice, the feature is planned to be implemented sometime in the future.
Get organized with scheduling groups
Even though a team can only have one schedule, a schedule can have a seemingly infinite number of groups. A simple schedule can have only one group, but if there is a need for several categories or sections, e.g., stores, groups can support that need.
When you create shifts, you always need create them for one group in the schedule. You can’t move shifts between the groups. You can copy the basic shift if you make a mistake, or want to create similar shifts for several groups in the schedule, but if you have added activities on the shift, those will not be included. However, if you copy entire schedules, then activities are also copied. More about this later.
Creating shifts: aim for a lot of information at a glance though colors and codes
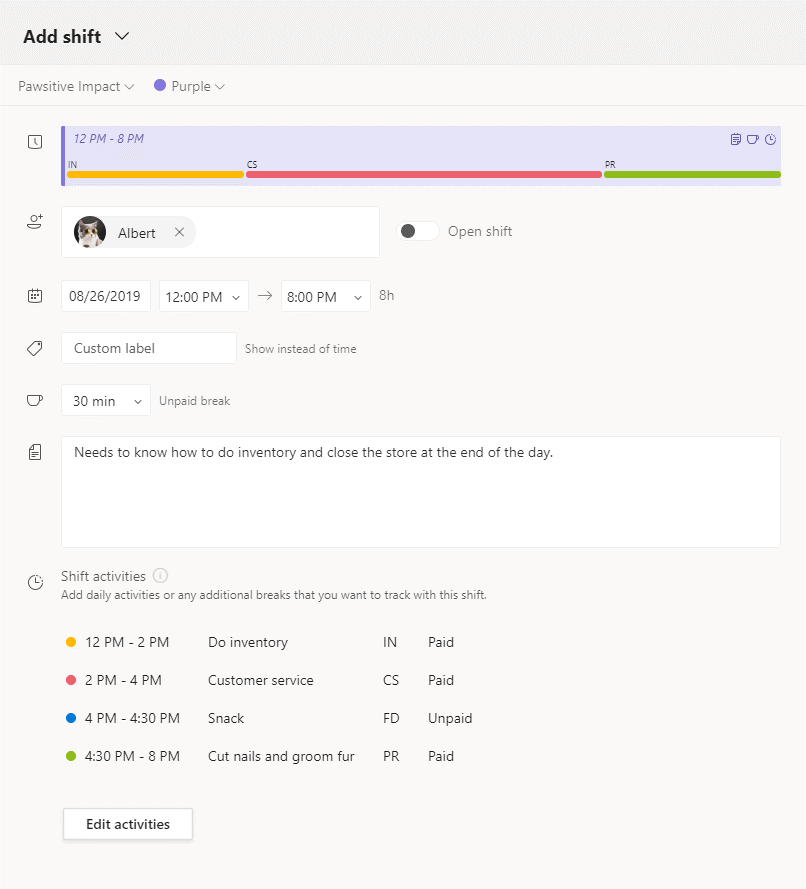
You have the following options when creating shifts:
- Start and end date and time of the shift
- Is the shift open or assigned to someone?
- If you are creating an open shift, you can choose the number of slots. This means multiple copies of the same shift are created for the same time slot, and those can be assigned to different people who are working at the same time, doing the same kind of a shift.
- A custom label/title to be shown in the schedule view (if left empty, the shift time is shown)
- The length of an optional unpaid break
- A note field for any information you might want to include on the shift.
- A list of sub-activities during the shift
- The shift color! Decide a color for each different type of shift and you get a nice color-coded schedule for easy viewing.
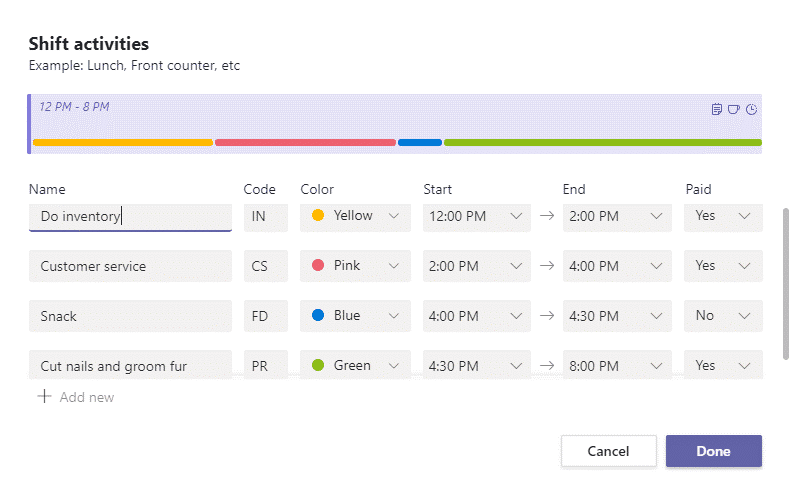
For (sub)activities, you can specify:
- A descriptive activity name
- Start and end time of the activity
- A two character code shown on the parent shift → helps checking when to do each subtask
- You can also color code the different types of activities to make viewing shift contents and schedule easier.
- Whether the activity is paid or not. For example, lunch could be added as an activity and then set as not paid.
Assigning shifts – not as straight forward as you may think
As mentioned, you can create a shift to be an open shift (to be assigned later), or create it directly for a person (this is currently the only option in the mobile app). Before you can assign a shift to a user, you need to add them to the same group where you have or are planning to create the shift.
Adding members to schedule groups is not limited to just the members of the team. If you add someone else than a team member to a schedule group, they automatically become a team member with no extra warning. Members can see all groups and published shifts in the schedule; they are not limited to only the groups they’ve been added to. If you want to reassign a shift from one person to another, you first need to move the shift to Open shifts and then reassign it.
Small nuggets you might easily miss(understand)
Just like you can add shifts, you can also allocate time off for the employees. There are several out-of-the-box reasons for time off, and you can also add your own. You only need to assign time off once per employee: the time will be blocked out for the user in all groups within the schedule. However, if the employee is a member of several teams, the booked time off will not be visible in those other teams. This makes it possible to book “time off” for an employee in one team if they temporarily move to work in another.
Managers can first work with draft versions of the shifts and then publish them for everyone to see when they are finished. This draft → publish process happens every time changes are made to the shifts. While working with a draft, managers can switch to the view that contains the most recently published versions of the shifts via the three dots next to the Share with team button, if needed. The important thing to understand here is that the whole schedule is not a draft, the individual shifts are.
The currently visible schedule view can be printed and exported as an excel file. The view can be a day, a week or a month.
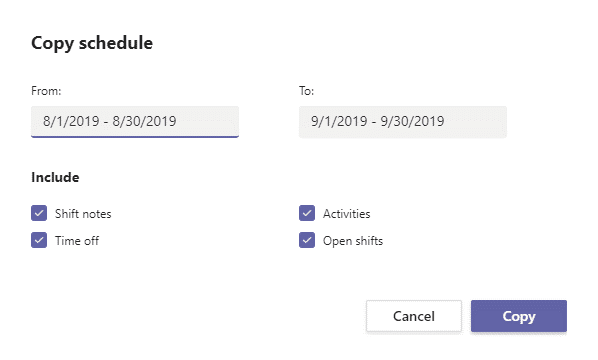
I already mentioned earlier that you can copy shifts. Better than that, you can also copy entire schedules. In practice this means that you copy all shifts between certain dates to another time span within the same team schedule. You can choose to copy as many consecutive days as you want, whether it is a day, a week, a month, a year, even more or in between. The time spans can also overlap. In addition, you can specify what information you want to include and leave out. Unlike when copying individual shifts, copying schedules retains the activities, if the option is checked. I’m hoping activities will be included when copying individual shifts in the future, as it is always easier to delete activities you don’t need than recreate the ones you do.
Other features: requests & time clocking
In addition to creating and viewing schedules, there are also a few other features you should be aware of:
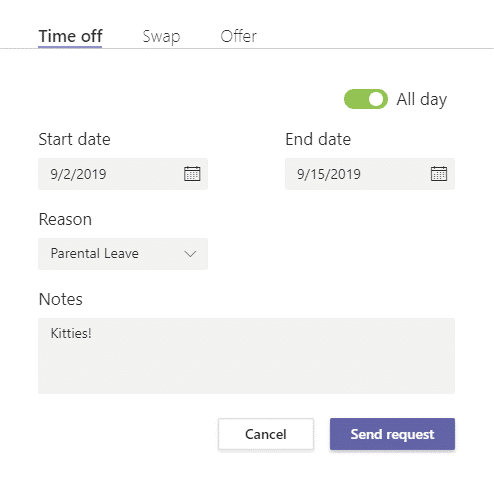
- Team members can request time-off, and team owners can either approve or deny those requests. Approved time-off is blocked for the user in the schedule automatically.
- A team member can suggest to swap one of their shifts with one of another employee’s shifts within the same schedule. The co-worker then either denies or approves the request. The other shift doesn’t need to be in the same group, and the people involved don’t need to be members in both groups. If the swap is approved by the other employee, a manager is asked to approve the swap as the final step. If the users were not yet members in the other scheduling groups, they are now automatically added. This is not a security concern as team members can see all the scheduling groups and shifts anyway even if they are not members in the groups.
- Team members can also simply offer one of their shifts to another team member without getting a shift in return. The approval process works the same way as for shift swaps.
All of these features can be enabled or disabled.
 There is also a new time clocking feature in Shifts that allows members to track their hours. The feature is not enabled by default, and you need to set it up for the team via schedule settings. In addition to tracking the time, you can also enable location detection, which requires the user to be at certain coordinates when starting and stopping their timer.
This feature can be used only via the mobile app. In addition to just starting and stopping the work timer, they can also start additional break timers, and manually edit the logged hours after stopping the main timer. If a person, e.g., always forgets to stop the work timer, they might prefer to track their hours completely manually which is also possible.
What’s next
If you managed to read this far, you should be aware of all the capabilities in Shifts; congratulations! Now you may be wondering: Hmm, we could definitely benefit from using shifts, but we have these business processes that would need to be integrated to it. Is that possible? Microsoft Graph offers us programmatic access to the data within Shifts, which means that we are able to create and manage schedules, groups, shifts etc. automatically. If you are interested in reading more, check out another one of my blog posts in my personal tech blog for more information!
I hope you enjoyed reading this article and learned something new! If you have any questions or comments about this topic, please let me know. Thank you for reading and until next time!
